Labels

Sunday, June 1, 2008

Generating DB Scripts with data from Excel


Prologue:


My web application was running successful with thousands of data running behind. Suddenly, a mail came from onsite saying all data has been wiped off and i was asked to insert data from the attached excel sheet. Murmured slightly for some additional effort adding to the already threatening deadline, i opened the excel. Fallen to death after rolling the scroll button, there are some 45000... rows. Then i thought of some cool code that can wisely convert these data to a beautiful massive DB scripts. It would definitely going to take time for learning this stuff, but i wanted to go wih it. Actually, this approach starts off late but reaches the goal well in time realistically.


Arena:


This is my excel sheet. Only got few data after all it's an example. I wanted is to write DB Scripts for DB2 and its of the form

INSERT INTO <table name> (<column names>) VALUES (<actual data>)


Now comes the part of some Java API that i could use to ease my job in accessing some vendor specific document. i chose rather simple one, the jexcel api amidst some poor performance and bug claims with it.
i created a Java project in my eclipse and added the downloaded jxl.jar through Right Click - Project -> Properties -> Build Path -> Libraries -> Add External Jars.
Then created a Java Class, named TestJXL.java which is given below.


public class TestJXL {
public static void main(String [] args) {
try {
Workbook workbook = Workbook.getWorkbook(new File("C:/SampleExcel.xls")); // take care of a potential IOException here
Sheet sheet = wb.getSheet(0); // 0 indicates first sheet. You can also get it by calling their names using an overloaded method of getSheet(String);

int rows = sheet.getRows();
int columns = sheet.getColumns();

//initializing my script as string
String schemaName = "A1G1.";
String tableName = "Employee";
String columnNames = "(EMP_ID,EMP_NAME,EMP_AGE)";
String script = "INSERT INTO " + schemaName + tableName + columnNames + VALUES;
// holder for data in cells
String [] holder = new String[3];

FileWriter fileWriter = new FileWriter("C:\\Output.txt"); // To use \
u need to escape it with another \.
otherwise stick with unix style, i.e /, just one.


String finalScript = null;
//Here we go...
for (int row = 1; row < rows; row ++) { // why row = 1 and not 0, well,
to just get away with the heading if you have any

for (int col = 0; col < columns; col ++) {
holder[col] = sheet.getCell(col,row).getString();
}
finalScript = script + "('" + holder[0] + "','" + holder[1] + "'," + holder[2] + ");";
fileWriter.write(finalScript);
fileWriter.write('\n'); // To write the next script on a new line
}
// A must
fileWriter.flush();
fileWriter.close();
}
// poor exception handling though its forgiven here as it's an example
catch (Exception e) {
e.printStackTrace();
}
}
}


Epilogue:


It took around one hour to finally come up with this working code but then, it produced lines of DB scripts in no time and finally i was well on my schedule to meet the deadline.

Saturday, May 10, 2008

Unix - Illustration of simple daytime client and server


Unix Network Programming is my another area of interest and i start it with this blogpost illustrating a simple daytime client and server communication. More posts will follow with more specialized areas.


Simple Daytime client


Its is a very basic illustration of a client establishing a TCP connection with a server and the server sends back the current time and date.
Following is the code written for daytime client.


#include <sys/socket.h>
#include <sys/types.h>
#include <netinet/in.h>
#include <netdb.h>
#include <stdio.h>

int main(int argc, char **argv) {
int sockfd,n=0;
char recvline[1000+1];
struct sockaddr_in servaddr;

if(argc!=2) {
printf("Error with arguments!!!");
exit(0);
}
if( (sockfd = socket(AF_INET,SOCK_STREAM,0)) < 0) {
printf("Socket Error!!!");
exit(0);
}
bzero(&servaddr, sizeof(servaddr));
servaddr.sin_family = AF_INET;
servaddr.sin_port = htons(13);
if(connect(sockfd,(struct sockaddr *) &servaddr,sizeof(servaddr))<0) {
printf("Connect Error!!!");
exit(0);
}
else {
while( (n=read(sockfd,recvline,1000))>0) {
recvline[n] = 0; /* null terminate */
if(fputs(recvline,stdout) == EOF) {
printf("fputs error!!!");
exit(0);
}
}
}
if(n<0) {
printf("read error!!!");
exit(0);
}
exit(0);
}

Following steps are the descriptions of the functioning of client
1. Create TCP Socket: The socket function creates an Internet stream socket. It returns an int which is used as the socket indicator for future references.
2. Soecify Server's IP address and port: Initialize the socket address structure to zero using bzero and set the port number to 13 (default port of daytime server on any TCP/IP host). Set the IP address as the command line argument. Methods hton(int ) (hton - host to network short) converts the binary port number and inet_pton( ) converts ASCII command line argument (IP address) to a proper format.
3. Establish connection with server: The connect function is used to establish a TCP connection with the server specified by the socket address pointed by the second argument.
4. Read server's reply and display: Since TCP is a byte stream protocol, we cannot expect server's reply as one big read of streams of bytes. Based on the size of data and other circumstances, the number of read may vary and its very very essential to enclose read within a loop and check for EOF.
5.Terminate program


Simple Daytime server


Following is the implementation of simple daytime server which communicates with the client written above.


#include <sys/socket.h>
#include <sys/types.h>
#include <netinet/in.h>
#include <netdb.h>
#include <stdio.h>

int main(int argc,char **argv)
{
int listenfd,connfd;
struct sockaddr_in servaddr;
char buff[1000];
time_t ticks;
listenfd = socket(AF_INET,SOCK_STREAM,0);

bzero(&servaddr, sizeof(servaddr));
servaddr.sin_family = AF_INET;
servaddr.sin_addr.s_addr = htonl(INADDR_ANY);
servaddr.sin_port = htons(13);

bind(listenfd, (struct sockaddr *)&servaddr, sizeof(servaddr));

listen(listenfd,8);
for( ; ; ) {
connfd = accept(listenfd,(struct sockaddr *)NULL,NULL);

ticks = time(NULL);
snprintf(buff,sizeof(buff),"%.24s\r\n",ctime(&ticks));
write(connfd,buff,strlen(buff));
close(connfd);
}
}

Following are the steps pertaining to daytime server's functioning.
1. Create a TCP socket: Similar to client implementation.
2. Convert socket to listening socket: Any TCP server has to prepare its listening descriptor and has to perform socket, bind and listen. This converts a normal socket to a listening socket. Constant 8 is used to specify the max no. of client connections that the kernel will queue for this listening descriptor.
3. Accept client connection and send reply: Once server enters into accept, the server process is put into sleep in the call to accept, waiting for client connection to arrive and accepted. A TCP connection uses 3-way handshake to achieve this successful connection establishment with another node (client/server). Once a connection arrives at the server, accept returns a connection descriptor and using that the current time at the server is written to the write buffer.
4. Terminate connection:Use close(connection desc) to close the connection one by one.


Steps to compile and run the daytime client and server programs


1. Save client program under the name daytimetcpcli.c under any directory. i have saved it in my /root.
2. Save server program under the name daytimetcpsrv.c under any directory. i have saved it in my /root.
Running Server:
3. Compile daytimetcpsrv.c first (because server should be ready before client requests for a response) using the command cc daytimetcpsrv.c.
4. Run the server program using the command ./a.out.
Running Client:
5. Open another terminal.
6. Compile daytimetcpcli.c using the command cc daytimetcpcli.c.
7. Run the client program with IP address as command line argument. Since the server is running in the same machine as the client runs, we can mention the IP address as 127.0.0.1 (localhost). Hence type ./a.out 127.0.0.1 and press return key.
8. Client shows the current time of the server.


Output screenshots


Fig 1 Compiling daytime server


Fig 2 Running daytime server


Fig 3 Compiling and running daytime client

Executed under Fedora ver 6

Wednesday, April 23, 2008

Customizing JFreeChart – Pie Chart


Introduction


Dynamic representation of data in picture format is inevitable in this programming era. JFreeChart is one of the best open sources in Java World in providing APIs to display dynamic charts viz., Line Chart, Bar Chart, Pie Chart etc., A wide collection of APIs are available under LGPL license not only to generate different charts but also to customize the generated charts with our own look and feel. My projects are basically Portal Applications that involve displaying a Pie Chart for the backend data. As the creation of pie chart just takes two or three lines, I felt it is important to explore more ways to customize the chart generated and the result is this blog. Following section briefly describes various ways to customize pie chart generated using JFreeChart.


Getting Started


For generating and displaying JFreeCharts we need to include certain libraries which are available in JFreeChart web page.
Place these jar files in your WEB-INF/lib folder:


1.jfreechart-*.jar
2.jcommon-*.jar


Creating a Pie Chart using JFreeChart libraries


Creation of pie chart won’t take you too many lines as it mainly needs the dataset for which you need to generate the chart apart from other details like Chart Title, Flag to say whether we need Legend or not etc., Following code shows a way to create a pie chart with available dataset and customize it in many available ways.


1: import java.awt.Color;
2: import java.text.AttributedString;
3: import java.util.List;
4: import org.jfree.chart.ChartFactory;
5: import org.jfree.chart.JFreeChart;
6: import org.jfree.chart.labels.PieSectionLabelGenerator;
7: import org.jfree.chart.plot.PiePlot;
8: import org.jfree.chart.plot.Plot;
9: import org.jfree.chart.title.TextTitle;
10: import org.jfree.data.general.DefaultPieDataset;
11: import org.jfree.data.general.PieDataset;
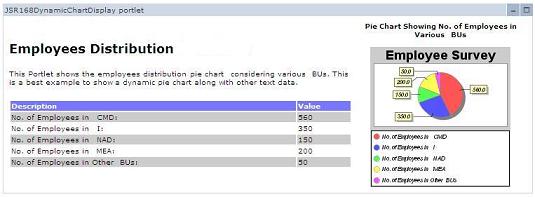
12: import org.jfree.ui.RectangleInsets;
13: import org.jfree.util.UnitType;

/*
* This class is used to create a sample pie chart using JFreeChart and customize it
*/

14: public class CustomizePieChart {
15: public static JFreeChart customizeSamplePieChart( ) {
/* Creating a sample Pie Dataset */
16: final DefaultPieDataset data =
new DefaultPieDataset ( );

/* Storing the sample Pie Chart Data in Pie dataset */
17: data.setValue("Software Engineer",50);
18: data.setValue("Programmer Analyst",20);
19: data.setValue("Technical Specialist",25);
20: data.setValue("Project Manager",10);

/* Create a Pie Chart */
/* Let the Legend be present */

21: final boolean withLegend = true;
22: final JFreeChart chart =
ChartFactory.createPieChart("Employee Survey",
data, withLegend, true, true );

/* Creating a pieplot so as to customize the chart generated */
23: final PiePlot plot = (PiePlot)chart.getPlot( );

/* Customizing Label using an inner class */
24: plot.setLabelGenerator(new CustomLabelGenerator( ));

/* Setting the BackGround Paint for Label */
25: plot.setLabelBackgroundPaint(Color.WHITE);

Customizing a Pie Chart by creating a PiePlot


In order to customize a pie chart we need to create a plot of type PiePlot. PiePlot extends basic Plot and this plot instance is provided by a static method of JFreeChart. Once a plot is obtained we can do dozens of customizations.


Customizing Pie Chart’s label


If you have a view at dataset for which the chart will be generated, it is just a collection of (name, value) pairs. Pie chart is generated for value parameter (which must be parsable into double) whereas labels and legends are displayed based on the name given. In order to customize label, we need to create an inner class within the class in which the pie chart is generated and pass an instance of that inner class (where we set some rules of how to display the label) to a method in PiePlot which displays the label the way we defined it in the inner class. See Line no. 24 for the PiePlot’s set method and Line no. 39 for static inner class that defines how label should be displayed.


We can also customize other properties of label using PiePlot. This includes,


1.Setting Label Background
2.Setting Label outline
3.Setting Label shadow
4.Disabling label links etc.,


Customizing Pie Chart’s legend


A pie chart’s legend is optional and if we wish to have, we can also customize it the way we did for label. See Line no. 28 for PiePlot’s set method and line no. 46 for static inner class that defines how legend should be displayed. We can also set the Legend items’ shape to pre-defined shapes and the default one is circle.


/* Setting the Outline paint for the labels */
23: plot.setLabelOutlinePaint(Color.WHITE);

/* Setting the Label Shadow Paint */
24: plot.setLabelShadowPaint(Color.WHITE);

/* Setting Legend Item Shape (Default is Circle Shape) */
25: plot.setLegendItemShape(Plot.DEFAULT_LEGEND_ITEM_BOX);

26: plot.setBaseSectionOutlinePaint(Color.LIGHT_GRAY);
27: plot.setShadowPaint(Color.WHITE);


/* Customizing Label using an inner class */
28: plot.setLegendLabelGenerator(new CustomLegendGenerator());


/* Creating a Title Object and setting its value */
29: TextTitle title =
new TextTitle("Employee Survey");

/* Setting the Background Paint for the title */
30: title.setBackgroundPaint(new Color(0.294f, 0.0f, 0.513f));

/* Setting the font paint for the title */
31: title.setPaint(new
Color(1.0f, 0.549f, 0.0f));

/* Expanding the title to the entire width of the pie chart image */
32: title.setExpandToFitSpace(true);

/* Setting the title instance to the chart, atlast */
33: chart.setTitle(title);


/* Setting insets to the pie chart image */
34: plot.setInsets(new
RectangleInsets(UnitType.ABSOLUTE, 0.0, 0.0,1.0, 1.0));


/* Specifying list of colors from which a Pie Section should be painted based on our choice */
35: Color[] colors = {Color.blue, Color.yellow,
Color.green, Color.GRAY};

/* Delegating the choice of color to an inner class */
36: PieRenderer renderer = new PieRenderer(colors);
37: renderer.setColor(plot, data);

/* Returns the chart with customization */
38: return chart;
}

Customizing Pie Chart’s Title


A pie chart’s title is defined when a new JFreeChart instance is created. We can also customize the same by creating an instance of type TextTitle and setting properties on created instance. See line no. 29 to 33 for details.


Customizing Pie section colors


When you create a default pie chart, all pie sections will be painted in system selected colors which are random. If you wish to define which pie section should be painted on which color, well, you can do that by creating another inner class that defines the exact selection of colors. See line no. 36 for 54 for more details.


Miscellaneous customizations


Apart from aforementioned customizations, following are the miscellaneous ones that I hope will be helpful for you.


  1. Setting insets

    Insets for a pie chart can be customized and we can even set ZERO inset.
    See line no. 34 for ZERO insets.

  2. Setting paints for BaseSection and Shadow.


39: static class CustomLabelGenerator implements PieSectionLabelGenerator {
/**
* Set customized label in the pie chart
*
* @param dataset PieChart DataSet
* @param key Comparable Key
* @return String Result String to be displayed
*/

40: public String generateSectionLabel(final PieDataset dataset,
final Comparable key) {
/* Creating a temporary string to hold value defined by us */
41: String temp = null;
42: if (dataset != null) {
/* Assigning the Value from dataset as a label for display */
43: temp = dataset.getValue(key).toString();
/* Modifying a particular label based on the Key name */
44: if(key.toString().equalsIgnoreCase("Software

Engineer"
)) {
temp = temp + "(Trainees Not Included)";
}
}
/* Returning the formatted string back to set the label */
45: return temp;
}
}


46: static class CustomLegendGenerator
implements PieSectionLabelGenerator {
/**
* Set customized legend in the pie chart
*
* @param dataset PieChart DataSet
* @param key Comparable Key
* @return Result String to be displayed
*/

47: public String

generateSectionLabel(final PieDataset dataset,
final Comparable key) {
/* Creating a temporary string to hold value defined by us */
48: String temp = null;
49: if (dataset != null) {
/* Assigning the Value from dataset as a legend item for display */
50: temp = key.toString();
/* Modifying a particular legend item based on the Key name */
51: if(key.toString().equalsIgnoreCase("Software

Engineer"
)) {
52: temp = temp + "(Trainees

Not Included)"
;
}
}
/* Returning the formatted string back to set the label */
53: return temp;
}
}


54: static class PieRenderer
{
/* Declaring an array of Color variables for storing a list of Colors */
55: private Color[ ]

color;

/* Constructor to initialize PieRenderer class */
56: public PieRenderer(Color[ ] color)
{
57: this.color = color;
}

/**
* Set Method to set colors for pie sections based on our choice
* @param plot PiePlot of PieChart
* @param dataset PieChart DataSet
*/

58: public void setColor(PiePlot plot,
DefaultPieDataset dataset)
{
59: List keys = dataset.getKeys();
60: int aInt;

61: for (int i =

0; i <

keys.size(); i++)
{
62: aInt = i % this.color.length;
63: plot.setSectionPaint(
keys.get(i).toString(),this.color[aInt]);
}
}
}
}

Generated Output


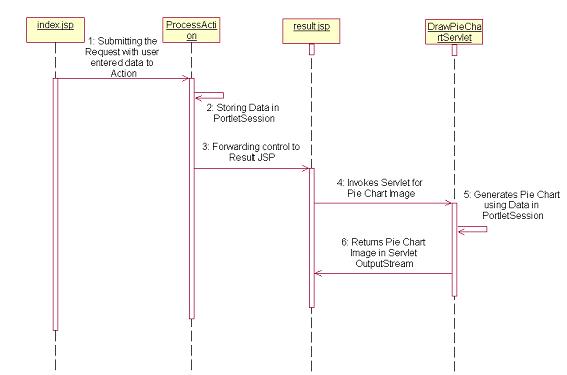
Following are the sample outputs that will show differences between a generic and customized chart. Since the project I involved is basically a web application I used a servlet to display all these charts.


Fig 1: Generic Chart – Not Customized Fig 2: Chart with customized label


Fig 3: Chart with customized legend Fig 4: Chart with customized title


Fig 5: Chart with ZERO insets Fig 6: Chart with custom pie section colors


Note: Copy the war file into the webapps folder of the Tomcat. Start the Tomcat server & view the charts (JSP) through a browser. [In the address bar give: http://localhost:/CustomizePieChart]

Saturday, April 5, 2008

Sorting using Collection provided methods


Basic sorting of a collection of String objects


Create a sample list of Strings


List nameList = new ArrayList( );
/* Adding data to arraylist */

nameList.add("John");
nameList.add("Adam");
nameList.add("Susan");
nameList.add("Rick");

Sort it using sort() method provided by Collections


Collections.sort(nameList);

Sorting of a collection of user defined objects say ‘Person’


Create a collection of Person objects


List personList = new ArrayList();

/* Adding Person objects to arraylist */

personList.add(new Person("John",23));
personList.add(new Person("Adam",24));
personList.add(new Person("Susan",22));
personList.add(new Person("Susan",18));
personList.add(new Person("Susan",15));
personList.add(new Person("Rick",30));


class Person {
public Person(String name,int age) {
this.name = name;
this.age = age;
}
private String name;
private int age;
public String getName( ) {
return this.name;
}
public int getAge() {
return this.age;
}
}

Create a Comparator to define the rule (i.e.., based on which ‘Person’s property, collection is to be sorted)Creating a separate class that implements Comparator


class CompareObjects implements Comparator {
public int compare(Object object1, Object object2) {
/* Casting objects from Collection to Person */

Person a = (Person) object1;
Person b = (Person) object2;

/* Getting Collator instance using java.text.Collator
since we are performing an alphabeticalcomparison instead of normal String comparison */


Collator collator = Collator.getInstance( );
int result = collator.compare(a.getName( ),b.getName( ));
return result;
}
}

Sort using the overloaded sort() method provided by Collections


Collections.sort(personList,new CompareObjects( ));

We can also create an anonymous inner class for Comparator and pass it to Collection’s sort method


Collections.sort(personList, new Comparator( ) {
public int compare(Object object1, Object object2) {
/* Method body same as given above */
}
});

Complex Sorting


Consider the scenario: All Person objects has to be sorted based on their ‘name’ first and if two persons have same name, they have to be again sorted based on their ages.
For this case, we can re-write our comparator as below


class CompareObjects implements Comparator {
public int compare(Object object1, Object object2) {
/* Casting objects from Collection to Person */
Person a = (Person) object1;
Person b = (Person) object2;
/* Getting Collator instance using java.text.Collator
since we are performing an alphabeticalcomparison instead of normal String comparison */

Collator collator = Collator.getInstance( );
int result = collator.compare(a.getName( ),b.getName( ));
/* When the result is 0, it means that two persons
with same name */

if(result == 0) {
if(a.getAge( ) < b.getAge( ))
result = -1;
else
result = 1;
}
return result;
}
}

Displaying Dynamically Generated JFreeChart in JSR 168 Struts Portlet


Getting Started


The sample portal application complies with JSR 168 Specification and uses Struts framework. Being a basic struts application, it has an index.jsp, action, form and a result.jsp. Pie chart is displayed in result.jsp with the data provided by user in index.jsp. A servlet is used to generate Pie Chart using JFreeChart and the generated image is returned in servlet’s outputstream so as to avoid the overhead of saving the image anywhere else in the application.

For generating and displaying JFreeCharts we need to include certain libraries which are available in JFreeChart web page. Place these jar files in your WEB-INF/lib folder:


  • jfreechart-*.jar

  • jcommon-*.jar


Note: Include jfreechart-*.jar, jcommon-*.jar in your java build path. Also, the class files must be put in the correct folder structure under our Portal application's /WEB-INF/classes directory.


Sequence Diagram


piechart-sequence

Figure 1: Sequence diagram for the sample JSR 168 Struts Portlet Application displaying Pie Chart

Steps in displaying dynamically generated JFreeChart in JSR 168 Portlet


Role of index.jsp, action and form class

Index.jsp is used to pass user specific data, in this example it is number of persons in various IBUs. Input fields are properly validated and once user submits the page, Action is invoked which stores the data from Form to PortletSession within Application Scope so that the helper Servlet can get the data. Action then forwards the control to result.jsp where the actual output is displayed.


Setting Pie Chart Data for PieDataSet in PortletSession

We need to pass data from ActionClass within Portlet context to the servlet in Application context. Normally, we cannot share data in Session even between Portlets. To achieve this sharing between a portlet and a servlet we use Application Scope when setting data in session. Following code snippet taken from action class serves this purpose.


ArrayList pieChartData = new ArrayList( );
/* Adding data used to generate Pie Chart into temporary arraylist */
pieChartData.add("No. of Employees in CMD");
pieChartData.add(Integer.toString(actionForm.getValueOfCMD( )));
pieChartData.add("No. of Employees in I");
pieChartData.add(Integer.toString(actionForm.getValueOfI( )));
pieChartData.add("No. of Employees in NAD");
pieChartData.add(Integer.toString(actionForm.getValueOfNAD( )));
pieChartData.add("No. of Employees in MEA");
pieChartData.add(Integer.toString(actionForm.getValueOfMEA( )));
pieChartData.add("No. of Employees in Other BUs");
pieChartData.add(Integer.toString(actionForm.getValueOfOthers( )));
/* * Storing the arraylist in session so that servlet rendering
* pie chart image can use it */

PortletSession session = request.getPortletSession( );
session.setAttribute("PieChartData",pieChartData,PortletSession.APPLICATION_SCOPE);

Creating a Servlet that generates JFreeChart PieChart with Data from PortletSession

In this application, HttpServlet’s doGet() method is used for the following purposes:-


  1. To retrieve data from Session

  2. To generate Pie Chart from the retrieved data and

  3. To write the generated chart in Servlet’s OutputStream


HttpSession object is used to retrieve data from session as given below


HttpSession session = request.getSession( );
ArrayList pieChartData = null;
pieChartData = (ArrayList)session.getAttribute("PieChartData");

JFreeChart is providing a bunch of APIs to create charts and customize them. Following block of code depicts the creation of sample pie chart with little customization.


/* Creating a piedataset */
final DefaultPieDataset data = new DefaultPieDataset( );
/* Storing the pie chart data in pie dataset */
for (int iIndex = 0; iIndex < pieChartData.size( ); iIndex++) {
data.setValue(pieChartData.get(iIndex).toString( ),Integer.parseInt(pieChartData.get(iIndex + 1).toString( ));
iIndex++;
}
/* Create a pie chart */
final boolean withLegend = true;
final JFreeChart chart = ChartFactory.createPieChart("Employee Survey",data, withLegend, true, true);

Returning Generated PieChart in Servlet’s OutputStream

Using JFreeChart API the chart is written to the OutputStream of the servlet as mentioned below.


OutputStream out = response.getOutputStream( );
response.setContentType("image/png");
ChartUtilities.writeChartAsPNG(out, chart, 200,200);


// Best Practice:
finally {
out.close( );
}

Creating a Servlet Mapping in web.xml

Once you are done with the Servlet the next and most basic thing one is the Servlet Mapping entry in web.xml as mentioned below.


<servlet>
<servlet-name>DrawPieChart</servlet-name>
<display-name>DrawPieChart</display-name>
<servlet-class>jsr168dynamicchartdisplay.helper.DrawPieChartServlet</servlet-class>
</servlet>
<servlet-mapping>
<servlet-name>DrawPieChart</servlet-name>
<url-pattern>/DrawPieChart</url-pattern>
</servlet-mapping>

Getting the output in Result.jsp

Once the textual data are displayed in the result.jsp, PieChart Helper Servlet is hit through an <img> mark-up element from result.jsp which in turn returns the image in its OutputStream.


<IMG src = <%=response.encodeURL(request.getContextPath( )+ "/DrawPieChart")%> border = "0">

Screen Shots
piechart-indexpage1

Figure 2: Index Page showing input fields

piechart-resultpage2

Figure 3: Result Page showing Pie Chart along with other textual data

References


http://www.jfree.org/jfreechart/

http://www.object-refinery.com/jfreechart/index.html

Download WAR file (Without JARs) from here.